
Outdoor Boys Bread Recipe: When it comes to simple and practical cooking, this Outdoor Boys bread recipe is something I personally trust every time I want quick, filling, and satisfying food. Inspired by the rugged and minimal cooking style seen on Outdoor Boys, this bread proves that you don’t need a modern kitchen to create something truly delicious.
I still remember the first time I made this bread. I had no oven, no fancy tools, and very limited ingredients. But once it was cooked, the outside had a light crisp texture while the inside remained soft and warm. That moment changed how I looked at cooking. It taught me that simplicity can deliver incredible results.
I am Om Shinde, and I focus on creating recipes that are practical, realistic, and useful for everyday life. This bread is one of those recipes that works anywhere—whether you are camping outdoors or cooking at home.
Understanding Outdoor Boys Bread
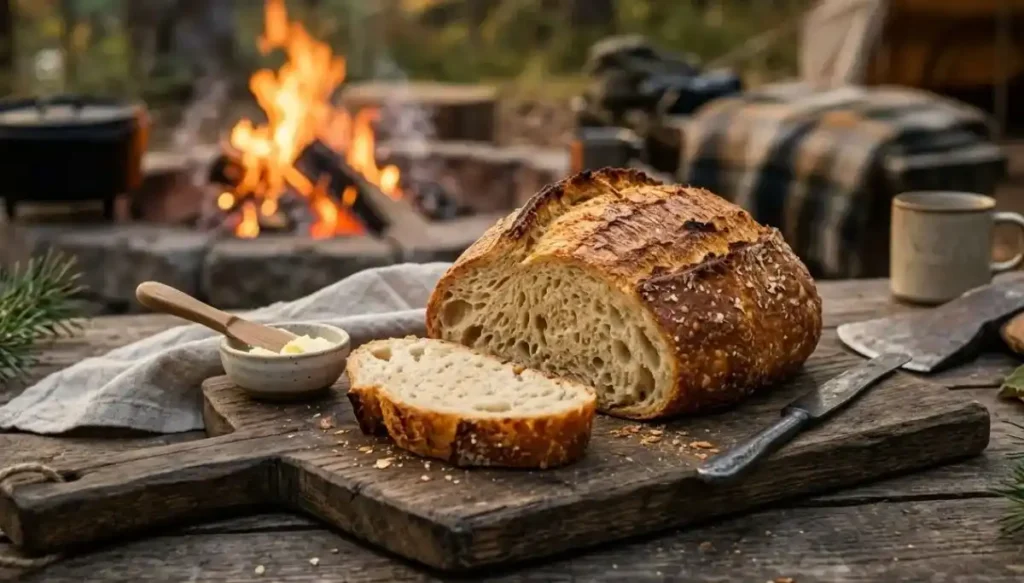
Outdoor Boys bread is a basic no-yeast bread that is cooked either over an open flame or on a flat surface like a pan. Unlike traditional bread, it does not require fermentation, proofing, or advanced baking techniques.
The result is a rustic bread with a slightly dense texture and a mild, natural flavor. When cooked over fire, it develops a smoky aroma that makes it even more enjoyable.
This bread is commonly used in camping and survival cooking because it is easy to prepare and requires only a few ingredients.
Why This Recipe Works So Well
From my experience, this recipe stands out because it focuses on the core principles of good cooking instead of complexity
- It uses minimal ingredients that are easily available
- It avoids yeast, which removes waiting time
- It adapts to different cooking methods
- It delivers consistent results even for beginners
The balance between simplicity and taste is what makes this recipe reliable
Ingredients with Proper Measurements
To get the best results, I always follow these exact measurements
Ingredients Table
| Ingredient | Quantity | Purpose |
|---|---|---|
| All-purpose flour | 2 cups (250g) | Provides structure and base |
| Water | 3/4 cup (180ml) | Helps form soft dough |
| Salt | 1/2 teaspoon | Enhances flavor |
| Butter or oil | 1 tablespoon | Adds softness and improves taste |
Optional additions can include garlic powder, herbs, or a pinch of sugar depending on your taste preference
Tools I Use for This Recipe
One of the biggest advantages of this recipe is that it does not depend on expensive equipment
Equipment Table
| Equipment | Purpose |
|---|---|
| Mixing bowl | For combining ingredients |
| Wooden stick | Used for cooking over campfire |
| Flat pan | Ideal for indoor cooking |
| Knife | Helps in shaping dough |
Step-by-Step Process I Follow
Step 1: Mixing the Dough
I begin by adding flour and salt into a bowl. Then I slowly pour water while mixing continuously. I do not add all the water at once because controlling moisture is important.
The goal is to create a soft dough that holds together without sticking too much to the hands
Step 2: Kneading the Dough
I knead the dough for about 5 to 7 minutes. This step improves the structure and makes the bread less crumbly after cooking.
If the dough feels sticky, I lightly dust it with flour. If it feels dry, I add a few drops of water
Step 3: Resting the Dough
Although this is a no-yeast recipe, I still let the dough rest for 5 to 10 minutes. This allows the flour to absorb water properly and improves the final texture
Step 4: Shaping the Bread
For outdoor cooking, I wrap the dough evenly around a clean wooden stick. I make sure it is not too thick, otherwise the inside may remain uncooked
For indoor cooking, I flatten the dough into a thick round shape
Step 5: Cooking the Bread
If I am cooking over a campfire, I hold the stick at a safe distance from the flame and rotate it slowly. This ensures even cooking from all sides
If I am using a pan, I place the dough on medium heat and cook both sides until golden brown
Cooking usually takes around 10 to 15 minutes depending on thickness and heat
Step 6: Final Finishing
Once cooked, I immediately apply butter on the surface. This not only enhances taste but also keeps the bread soft
Read Also: Triple Delight Chinese Food Recipe, Quick No-Bake Dessert Ready in Minutes
Important Techniques That Improve Results
Over time, I have learned that small details make a big difference
- Medium heat ensures even cooking without burning
- Continuous rotation prevents uneven texture
- Proper kneading improves softness
- Slight resting time enhances dough quality
These techniques help in achieving a balanced texture every time
Different Cooking Methods Explained
Campfire Cooking
This is the most traditional method and gives a smoky flavor that cannot be replicated indoors
Pan Cooking
This is the easiest method and works perfectly for beginners
Direct Flame Cooking
This method is faster but requires constant attention to avoid burning
Each method has its own advantages, but I personally prefer the campfire method for its unique taste
Flavor Variations I Personally Enjoy
Sometimes I like to experiment with this recipe to make it more interesting
- Adding garlic powder for a strong savory taste
- Mixing dried herbs like oregano or thyme
- Applying honey or sugar for a sweet version
- Adding a small amount of cheese inside the dough
These variations keep the recipe flexible without making it complicated
Best Ways to Serve This Bread
This bread is very versatile and pairs well with many foods
- With butter or jam for a quick breakfast
- Alongside grilled meat for a complete meal
- With soups for a comforting combination
I usually prefer eating it warm for the best experience
Common Mistakes and How I Avoid Them
Many people fail to get good results because of small mistakes
- Dough too sticky makes it hard to shape
- High heat burns outside while inside remains raw
- Not kneading properly affects texture
- Thick shaping leads to uneven cooking
By correcting these, the results improve significantly
Storage and Reheating Guide
Storage
I store the bread in an airtight container, and it stays fresh for up to 2 days
Reheating
I always reheat it on a pan with a little butter instead of using a microwave. This keeps the texture soft and fresh
Frequently Asked Questions
Is yeast required for this recipe
No, this is a no-yeast bread and works perfectly without it
Can I make this bread at home
Yes, I regularly make it on a pan, and it turns out great
Why is my bread not soft
This usually happens due to overcooking or dry dough
Can I add extra ingredients
Yes, you can add herbs, garlic, or even cheese based on your preference
How long does it take to cook
It takes around 10 to 15 minutes depending on heat and thickness’s
